Instructions on how to set up BlueWindow HTML email signatures
Please note these instructions were taken from previously published pages. Each cited page can be accessed by clicking the title within the associated tab.
All Custom HTML Signatures are listed on this page below the instructions.
Creating Complex HTML Email Signatures In Microsoft Outlook 2011 For Mac
Please visit this link for originating document.
Step 1
Locate your custom HTML signature below, and select all of the signature, being sure not to get blank spaces above or below. Also be sure to select the BlueWindow logo. Press Command + C on your keyboard to “Copy”

Step 2
Open Outlook Select “Preferences” and “Signatures”

Step 3
Click the plus button on the lower left to create a new signature. If there’s content in the big right signature window after you’ve clicked the plus icon, delete it. In my case, it was displaying my first and last name.

Step 8
Press Command + v on your keyboard to paste in your signature that you copied from your browser

Step 9
Set your “Default Signatures” and rejoice!
Installing your Email Signature in Outlook 2013
Please visit this link for the originating document.
Before you begin installing the signature, you will need to see the hidden files and file extensions.
- Go to your File Explorer (Windows key + E)
- Select your hard drive (C:/ for most users)
- Click on the View drop-down box
- Check the Hidden Items and File Name Extensions box
Now that this is done, we can get working on installing your signature.
- Download your custom HTML signature file (below)
- Open File Explorer (Windows Key + E)
- Copy downloaded file to clipboard.
- Go to Your Username/AppData/Roaming/Microsoft/Signatures/
- Paste your .HTM signature in the Signatures file.
- Open Outlook 2013 and go to FILE
- Go to Options
- Click on the Mail Tab and then on the Signatures button
- You should see your signature in the list of Select signatures to edit box. The name of your signature will be your file’s name. Also, in the Edit signature box, your signature may not display properly. Do not worry, this is perfectly normal. Do not make any alterations. Make sure that you choose your signature in the New Message and Replies/Forwards
- CONGRATULATIONS! Your signature is now installed!
The Right Way to Install an HTML Signature in iOS 7 Mail
Please visit this link for the originating document.
-
Copy Your Signature to the Clipboard – Custom HTML Signatures are blow.
Tap and hold your finger on some part of the signature that is not a link. When the iOS select box appears, drag the little knobs at the end to surround your signature as best as possible. When surrounded, tap the “Copy” button to copy your signatures to your iOS Clipboard.

-
Paste Your Copied Signature
Navigate to the iOS Settings App, then to “Mail, Contacts, Calendars”, then to “Signatures”. Here you can paste your signature for all email accounts, or just one if you would rather. Tap twice in the empty box and select “Paste” from the popup menu.
NOTE: The signature will not look right, especially if you have special formatting applied to links. We will fix that in the next step.

-
Shake to Undo
Apple automatically tries to “enhance” the signature when you paste it, causing it to become messed up and distorted. Luckily, they allow us to Undo these “enhancements”. Shake your device until an “Undo Change Attributes” screen shows.

Select “Undo”. After this, the signature will revert to your original, pasted design.

-
Send an Email
Go back to the Mail app and try sending an email from the account that you installed the signature on. It should now work as expected.
Excerpt from: How to Install HTML Email Signature for Google GMail
Please visit this link for the originating document.
Note: Must be done from desktop computer (changes will be reflected on mobile application)
Step 1: Copy your signature block from custom signature section below.
Be sure to highlight ONLY the signature and no spaced below or above. Alos be sure to select the BlueWindow logo. Your selection should look like this:

Copy this to your clipboard (Ctrl+C) or (Command+C).
Step 2: Open GMail Settings

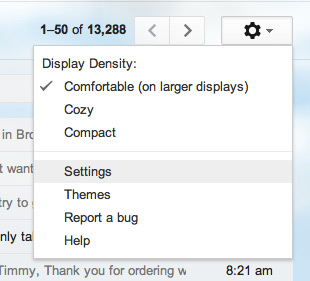
In Gmail, you may see a Machine Bearing icon on the upper right hand side. In the drop down menu, go to Settings.
Step 3: Paste HTML Content and Save

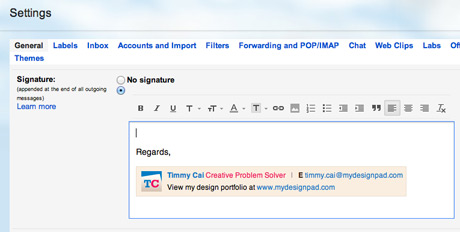
Under the General tab in Settings, scroll down till you find the Signature section. Ensure the proper account is listed on the Signature dropdown box (if multiple accounts exist), then Click inside the Signature edit box and go to Edit > Paste to paste in the HTML you have stored in the clipboard (Ctrl+V) or (Command+V). Click “Save Changes” right below the Signature edit box.
To Create Your Signature in Web-Based Email
- Locate your custom HTML signature below, and select all of the signature, being sure not to get blank spaces above or below. Also be sure to select the BlueWindow logo. Press Command + C on your keyboard to “Copy”
- Log in to Web-Based Email.
- Compose new email.
- In new email body, on line 3 paste your Custom HTML Signature.
- Select the logo and press the ‘Align Left‘ text formatting button.
- Highlight the ‘BlueWindow’ text before the URL, bold and format to color: #28337a (Copy and paste into pop-up)
- At the top of the email. select the disk icon (Save as…)
- Select Template and name BlueWindow
Now, when sending BlueWindow emails, simply go to the Templates folder on the left menu and select the BlueWindow template. This will open up the email you just started, with your signature nicely in place.
